Okay guys here it is, my Kitchen Redo! I should start by warning you, my kitchen is nothing fancy! It will never been in a magazine, or pinned a ton of times on pinterest. The pictures are terrible, there is almost no way around it. Our house is an east / west facing house so there is either a crazy amount of light that leads to glare or no light at all in the afternoon. Not to mention there is still so much work to do, but I wanted to share what I’ve accomplished so far.
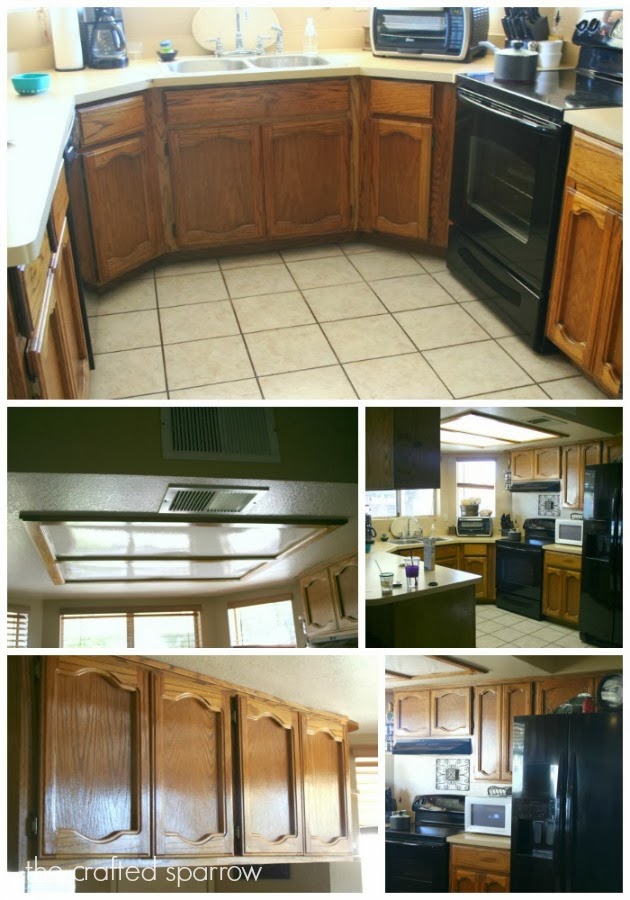
We are on a very limited, and by limited I mean “tiny” budget when it comes to fixing up things around the house. Up to this point the kitchen has been updated by paint, and new inexpensive light fixtures. Before we go any further I feel it necessary that you see the “BEFORE” pics. Heaven help me, this kitchen was dripping with 1984 goodness! Awesome oak cabinets, yellow’ish laminate countertops, tan walls, fluorescent light fixtures…you get the idea.
Our kitchen is small, not tiny…but not the most well thought out plan the builders could have come up with. The ceilings are dropped to about 9 ft. which makes this space so much smaller. We have the 1980’s cabinets over our large section of the countertop. Unfortunately it’s something at this present time we can’t take down either. If we did we would literally have no space for dishes to eat off of. As you can see we have two very narrow cabinets next to the fridge, two small cabinets above the fridge and the stove. Eventually my goal would be to remove these over the counter cabinets to open the space up and build a custom cabinet for dishes somewhere.
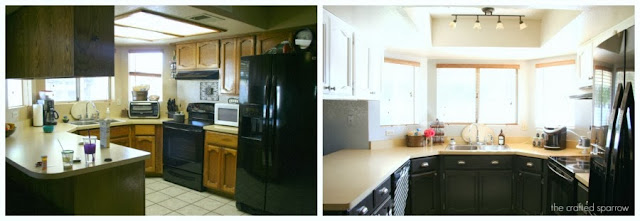
Here is a side by side of the before & after.
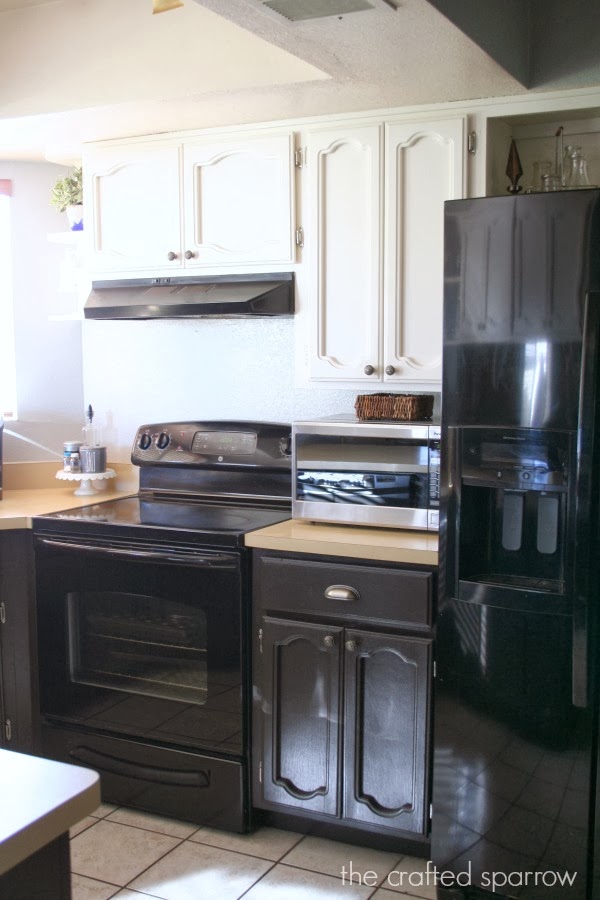
I decided on a two tone paint job for the cabinets because I love the look and thought that the creamy white cabinets would get trashed on the bottom with our boys. Although now I have changed my mind, and I think eventually when I muster up the energy I may just repaint all the bottom ones creamy white too. I love the white so much, and love how bright it makes the space feel. The bottom cabinets were painted a custom deep espresso color, it took me about 15 gallons of mixing paint to get the color right. The sweet guy at Lowes was so kind and patient with me.
I purchased hardware in an antiqued silver finish, I didn’t want it to be super shiny. I found the cute knobs at Hobby Lobby for 50% off, so they were about $1.50 each. The drawer pulls are from Amazon, and were $3 each…so much cheaper for the quality than I found in stores. They are a great deal. I’m really happy with both of my choices.
One of the things that HAD to go was the awful wood framed fluorescent lighting. When we removed the wood and plastic panels there is a raised portion to the ceiling. We are in no means great DIY’ers when it comes to home improvement. Although we did try our hardest to make it look decent while staying in our “tiny” budget. We purchased these two track lighting fixtures at Lowes, I think they were around $70 each. There were originally two fluorescent tracks up there, so not wanting to re-wire at this time we patched any small holes and just mounted the new fixtures where the old ones were mounted. I also had to texture and paint the entire ceiling since none of it had ever been done before.
I removed the doors above the fridge, we couldn’t even open them before anyway since the fridge is so tall. When we bought the fridge we had to cut about 2″ off the bottom trim of the cupboard to get it to fit in there. I love having this open space and eventually it will be filled with fabulous things. For now it has some of the vintage milk bottles I found at a garage sale a few years ago, and some other small decor.
On each side of the cabinets by the bay window are these little display shelves. One thing I do not love is the new ceiling crack that runs from the cabinets all the way to the center of the raised portion of the ceiling. I’m praying it’s not a sign of bad things to come with the cabinets over the counter.
This sweet antique cobalt blue little salt bowl is from one of my mom’s trips, she grabbed it for me as a gift. It’s darling.
No decor is permanent at this point, things are still evolving. I know where I want it to go, and someday it will get there. My goal is to have all neutrals in the kitchen and through out the main living areas of the house. Then I will add small pops of color which can easily be switched out.
We have a great fushia pink rose bush in our backyard, and I’m so lucky to have 3 guys in the house that pick flowers for me all the time. There is usually a vase full of these pretties.
The walls were previously the most awful tan color ever. Almost the same color as the countertops. Don’t ask what I was thinking because I have NO idea. I had just had my first baby and must have been sleep deprived. Yes it only took 9 years to repaint them, you’ve heard me say before how much I hate painting walls. I went through about 25 samples of gray paints for this redo. Since the paint wasn’t just for the kitchen but for the family room, my office (which is the front formal living room) and hallway it needed to be the right color. Not too dark, but not too light. I finally chose Light French Gray from Sherwin Williams, in satin. It’s a great color.
Here is a list of things to still be done:
– Countertops! I would love ANYTHING else besides these counters. Concrete, new laminate, granite, anything! Someday soon I hope this can be one of the next things to get updated. I considered painting them with rustoleum countertop paints, but I’ve heard it’s not even worth my time.
– Floors! Holy moley how I lust for new floors! The tile in this house is nothing short of gross in my opinion. It’s the cheapest tile ever, the grout was never sealed so it’s black. I would love more tile but our foundation causes the tile to crack constantly. I am in love with the faux wood tiles. So I think I’m leaning towards faux wood floors at some point.
– Decor! I have plans to create something for the tops of the windows instead of curtains or a window fixture. The wood blinds are a natural wood color throughout the whole house and we got them at such a ridiculously good price several years ago, and they will probably never be switched out. I’ve actually considered painting the white, but I’m terrified it would backfire on me.
– Faucet! We purchased this current faucet last year with a new stainless sink, and it’s already broken. While it doesn’t necessarily need to be replaced, I would totally go with a different style now and a different sink. This is probably the last thing on the list to happen.
– Appliances! While most of these current appliances are all under 4 or 5 years old, if I was ever given the opportunity to purchase new ones I’d definitely pick stainless steel.
Well for now that is it. I hope you think it looks so much better like I do. The pictures really don’t do it justice. It’s so much fresher and brighter than before. I can’t wait to get it all finished someday.









Wow! What a difference it makes with the painted oak cabinets. Love the outcome! I’d say enjoy the two tone for now as it’s so in style. I can only imagine your surprise when taking down the fluorescents to find the area above. Good luck with your future plans – it all takes time.
What brand paint did you use?
Rebecca, your Kitchen looks absolutely AMAZING!!!! Dated kitchens can be so difficult to work around, but you have transformed it so Beautifully. I LOVE LOVE LOVE how did, dark cabinets on the bottom and lighter cabinets on top. The hardware is lovely as well. And, how VERY sweet to have fresh picked flowers from the men in your life 🙂
xoxo
Your kitchen looks fantastic! I have very similar cabinets and dislike them just as much! Would you mind telling me how you went about stripping the poly off the old cabinets or did you just use a primer before painting?
@Brittany Cerminara – I used Olympic 2-in-1 from Lowes. It’s supposed to have a enamel like effect. I would probably either use that or the valspar signature.
I actually didn’t have to strip the cabinets. I used a de-glosser which you can find at any home improvement store. Mine were pretty dry and worn to start with. I also started by cleaning everything with TSP ahead of time to remove grime and grease.
I wish I could say that I primed my cabinets, but I thought they were dry enough and rough enough to not prime them. Big mistake. Even though I used a 2-in-1 paint with primer I still should have primed before hand with a super grip primer. This is one thing I regret. My espresso cabinets get scratches often. They are easy to touch up, just a pain. I should have done it right the first time.
I LOVE LOVE LOVE How it is coming out. I had those exact oak cabinets..and I painted them too. Plus i had the same style of light, but mine was a dropped box and I ripped that sucker out. I couldn’t be happier.. and I am sure you will love yours when it is all done!
@TheKimSix Fix – Thanks girl! I am loving it much better!
Looks so much nicer! We did a kitchen remodel this year after living with a kitchen circa 1978….yikes. I love our new one so much more now!
I think your kitchen looks amazing! I have wanting to paint my cabinets for along time, they are at least 20 years old.