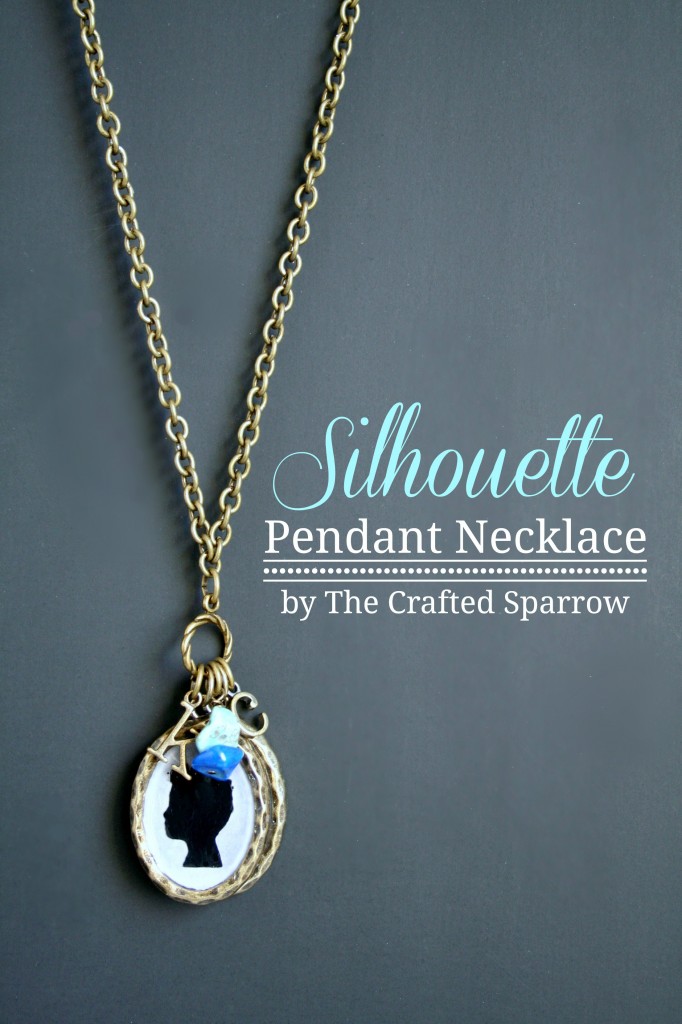
With just about 3 weeks left until the SNAP2013 begins I wanted to share this DIY Silhouette Pendant Necklace that I made to take with me. It’s my little way of having my boys with me and close to my heart since this will be the first time I’ve left them for longer than a night.
Here’s what you will need:
– Modge Podge Dimensional Magic
– Modge Podge
– Black & White Card Stocks
– Any Pendant with a raised edge
– Your favorite cutting machine
– Jewelry chain with findings
{chain, jump rings, clasp} or a finished chain from the craft store
– Pliers & a Sharp Pin
– Small Paint Brush or Toothpick

I purchased two of these antique brass oval pendants from Hobby Lobby – the brand is “The Jewelry Shoppe” findings. I use this brand a lot with my jewelry, and really like it for the price. You can choose any pendant shape or size that has edges for the Modge Podge Dimensional Magic to stay in.
 I began by cutting an oval with my cutting machine out of white cardstock (I measured my pendant first so I knew what the dimensions of my oval should be in my cutting machine program).
I took a side profile picture of my boys standing in front of a white door in our house. I edited the background out of my photos in photoshop, then using my cutting machine program (I used this awesome tutorial that I Heather from Whipperberry posted a few weeks back) to cut my silhouette shapes from the black cardstock.

Next you will need to brush a small amount of regular Modge Podge in to the well of your pendant, then place the white cardstock oval in the pendant and smooth down.
Then apply a small amount of Modge Podge to the back of your silhouette shape and apply that in the center of your pendant.
I used a toothpick to apply my Modge Podge to both pieces of cardstock. Let the pendant and Modge Podge dry for about 30 minutes.
When it’s dry you will now use your Modge Podge Dimensional Magic to create a beautiful glass look to your pendants. (Be careful to not shake it or it will create air bubbles in the product.)
Begin by squeezing out some of the Dimensional Magic on to a paper towel. Then fill in your pendant carefully – it helps to not lift the bottle a bunch of times.
Once it’s full, if there are any air bubbles, carefully use a sharp pin or needle to pop them. (I will admit I had to do this pendant several time to get the finish without air bubbles and wrinkles. It was a learning process for me too.)
Once you’ve filled it all with the Dimensional Magic set the pendants aside safely to dry for at least 3 hours.

When it was time for me to make my chain necklace I used chain, and findings that I had in my stash of jewelry supplies.
I like my necklaces longer since I’m well…bigger in the chest than most girls (just keeping it real). So I usually make my chains 33 – 36″ long, most longer necklaces are between 30 – 33″ in length. I also added a few colored stones that I had on hand, the colors resemble the boys birthstone colors and I am loving how they look together. I also found a couple small antique brass initial charms at Hobby Lobby and added those. I attached all my charms to a small round toggle style clasp piece, this is optional…I just like them to all stay in one spot on my necklace.
Once you get everything on your chain, your done! I really love how this necklace turned out, I’m addicted to antique brass finished jewelry right now so this is a perfect piece that I can wear all the time. I hope you like it too!


i love this project. hope to meet you at snap!!
I haven’t tried the dimensional mod podge yet – looks like it works really well. Great necklace!
Thanks Jamie! Yes I hope we get to meet too! Can’t wait!
I love this!! Such a great mommy necklace. Thanks for linking up at Whatever Goes Wednesday. We’ll be featuring your necklace at Someday Crafts this weekend, so come check it out if you have a spare minute! 🙂
These are Super Cute!! I love Modge Podge Dimensional!! I did some Initial Silhouettes with it. I seriously need to get my photoshop on!! SOMEDAY!! 😉
xo
Angelina
This is adorable! love it 🙂
These are so pretty! I really appreciate that you shared how to do it, thank you!
What an amazing keepsake…and pretty too! If you get a chance, I’d love if you showed it off at All Things Pretty! http://sparklesandastove.com/all-things-pretty-thursday-2/
These are very pretty. Have fun at SNAP!
These are beautiful! Great tutorial. Definitely want to do this!
this is the cutest thing I have ever seen. thanks for showing how you made it. love it!
So precious, love this idea!
I recall as a girl my mother having an necklace with silhouette charms on it. Never know what happened to it, but always loved the concept. Love what you’ve done here